Showing posts with label crochet. Show all posts

Friday, February 1, 2013

Crocheted Bobble Baby Blanket

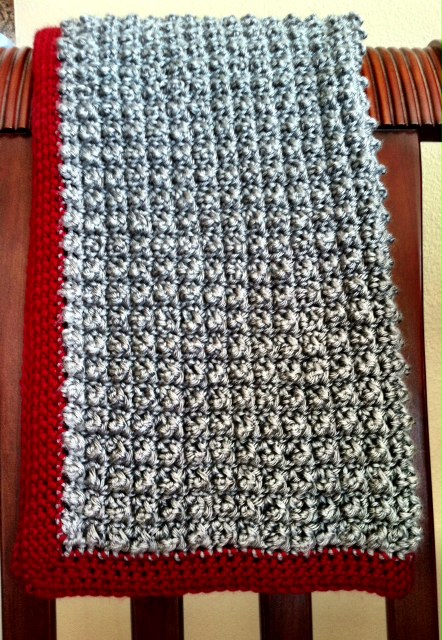
I have never crocheted a blanket.  I know, it is hard to believe because most beginning crocheters start with a scarf or blanket due to the repetitive stitch pattern that is easy to follow.  But not me.  I learned how to crochet and went for the hard stuff right out of the gate.  Now, needing to make a gift for a baby shower, I decided I wanted a soft blanket, but not anything that looked like the standard "granny afghan".  So I played with a few stitches and came up with this:


This was such a simple stitch pattern, but took a lot of time.  I would estimate that it took me close to 15 hours to put this together.  It measures approximately 19in x 32in.  It isn't a large baby blanket, but I think it is perfect size to put over the baby in the car seat, or even to use as a diaper mat.  It is perfect size to roll up into a diaper bag :-)

Here is the pattern:

Yarn:  Caron Simply Soft in Heather Grey and Amber Red
Hook: Size 9 / I / 5.5mm

Begin by chaining 95, turn.  Sc in the second ch from the hook, triple crochet in the next. * Sc in the next, triple crochet in the next*.  Repeat from * to * to the end of the 95 chains.  Once you reach the end, ch1 and turn.  Repeat this pattern until you have reached your desired size.  

I added a single crochet border.  I used 4 rounds of single crochet stitches.  For the corners, sc 3 in each corner stitch to create a "corner" effect.
  Enjoy your new blanket!  I am sure this can be expanded to a large blanket by beginning the blanket with a longer ch string.  You might try ch 160, instead of 95.  

Monday, January 28, 2013

Crocheted Valentine's Headband

With Valentine's day right around the corner, I wanted to make something that was quick, easy and versatile since I am always short on time and love to create things that have multi-purpose.  I whipped up this headband in about 30 minutes and quickly realized that it could be used in so many other ways.  But this is a picture of my sweet 4 month old modeling it as a headband.


First things first, the pattern.  I wish that I could call this my own, but I found it here from Posh Pooch Designs.  I followed the pattern on the hearts, but instead of slip stitching the hearts together, I used a needle and threaded them together with all the loose ends.  This made more sense to me, as I needed to weave in my ends anyhow.


Once I had all my hearts sewn together, my next step was to ch 25 (twice, one for each end of the headband), and then slip stitch them into the last heart on each side, and weave in all loose ends.  This creates the ties that you will tie together to secure the headband.


I realized that the pattern was originally intended to be a dog collar, so I created a matching one for our sweet pup:


Then I realized that this can be purposed into a nice Valentine's Day garland as well, thanks to a suggestion from one of my amazing friends.  So now, I am working on increasing the size of the hearts to make a larger garland version of this cute creation.

Happy crocheting friends ~ Sara

Friday, January 25, 2013

Cat in the Hat Crochet Pattern


The other day, my sister-in-law requested that I make a "Cat in the Hat" themed baby shower gift.  I was up for the challenge and here is what I came up with.


The hat is a newborn size, and I will be giving the pattern here for free.  I will be working on the pattern for larger sizes and will update here, once I have them tested.  The diaper cover pattern comes from Repeat Crafter Me and was super easy to follow.  


Hat - Newborn Size:

Yarn: I used I Love this Yarn - Soft in red and white.
Hook Size: H (5.0mm)

Begin by creating a magic ring with the red yarn, Ch2 (ch 2 counts as the 1st dc here and throughout).

R1:  work 8 dc into the ring and attach with a slip stitch to the 1st dc.  (8)
R2:  Ch2, dc in the same sp as the ch2, 2 dc in the remaining, join to the 1st dc with a slip st (16)
R3:  Ch2, dc in the same sp as the ch2, *dc in the next, 2 dc in the next.*  Repeat from * to.* Join to the 1st dc with a slip st  (24)
R4:  Ch2,  dc in the same sp as the ch2, dc in the next 2, 2 dc in the next.* Join to the 1st dc with a slip st (32)
R5:  Ch2,  dc in the same sp as the ch2, dc in the next 7, 2 dc in the next.* Join to the 1st dc with a slip st (36)
R6: Ch2, working in the back loop only dc in the next and all remaining (36)
R7:  Ch2, dc in the next and all remaining (36)

Tie off and Switch to white yarn:
R8-9:  Ch2, dc in the next and all remaining (36) 
Tie off and Switch to red yarn:
R10-11:   Ch2, dc in the next and all remaining (36)

Tie off and Switch to white yarn:
R12-13:  Ch2, dc in the next and all remaining (36) 
Tie off and Switch to red yarn:
R14-15:   Ch2, dc in the next and all remaining (36)
Tie off and Switch to white yarn:

To make the Brim:
R16: Ch2, dc in same sp as Ch2, *dc in the next, 2 dc in the next.* Repeat from * to.* Join to the 1st dc with a slip st  (54)
R17:  Ch 2, hdc in the same sp as the ch2, hdc in the next 2, 2 hdc in the next.* Join to the 1st hdc with a slip st (72)
Brim should begin to fold up on its own.  Let the center of the hat fall down into the hat.  This will allow the hat to stand up firmer.  (The crown of the hat shouldn't fit like a normal beanie)


Happy crocheting ~ Sara